Sales
Quotation & Sales Order- Peachtree
The word Quotes is the quotation which is used by seller to
the buyer on the demand of buyer.It consists of details of per unit price,
description of the good and good’s quantity.
Following is the whole procedure for the user to create
Sales quote
Step 1
Click on the task menu and then select the option of
Quotes/Sales Order. After which select from the sub menu Quotes.

After which the following window will appear as follows:-
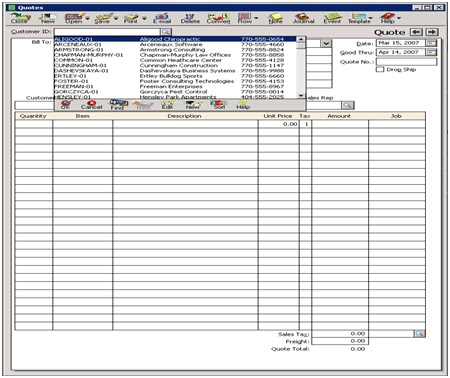
Step 3
When user create and select the customer ship to field will
be filled with the address of customer where the shipment will be send.
Step 4
After this enter the date on which the quotation are issued
in Date field.
Step 5
Now enter the date on which this quotation will expire in
Good thru field
Step 6
Enter the reference number in Quote no field. This field is
used to give a unique or different code
to each quotation for identification and avoid repetition in issuance to the
customers.

Step7
In the field of Customer PO customer purchase order
number can be written.
Step 8
In Ship Via field select the
method of delivery for the goods.
Step 9
The term field and description will be filled automatically
when you select the customer.
Step 10
The sales representative ID can also be entered in Sales Rep
field.
Step 11
Enter the quantity of items for quotation in Quantity field.
Step 12
Now we can select the item ID in the item ID field.
Step 13
Enter the per unit price of the item.
Step 14
Click on the save button to
save the quotes.
Step 15
For converting the quotes
into the sales order enter the Good thru date then press the convert button.After
which a box will open as follows then select the sales order option and then
press the OK option .It would be converted.

Sales Order
Click on the task menu and then select the option of Quotes/Sales Order.
After which select from the sub menu Sales order. Then the following window
will appear as follows:-

Then fill all the required fields of the Sales order in the
same way as in Quotes are filled. The main difference between Quotes and Sales
Order is of Quote no which is filled in quotes and SO which is filled in case of Sales
Order.

The main difference between Quotes and Sales Order is of Quote no which is filled in quotes and SO which is filled in case of Sales Order.


How to make Sales invoicing at Peachtree
Sale invoice is prepared against the sale made to the
customer. As soon as the goods are sold to the customer we make this sale
invoice
At first click on the Task Menu and select the option of Sales/Invoicing.

Then following window
will appear as follows:-

In this window to
create new invoices
We select the customer in the left side of the window in
Customer ID
We then define the shipping address in Ship to
The invoice number will be invoiced automatically

Right below these boxes we observe two tabs
Ø
Apply to sales order
Ø
Apply to sales
In the first we choose the existing sale order if any
otherwise we will select the Apply to Sale option.
After filling them we fill the information of the invoice
itself regarding quantity, product and description, unit price, total amount,
and below it in the same column the sales tax. All this information is filled
up when we select an existing sales order.
How to make receipts at Peachtree

Observe the similarities between the receipts window and the
payments window. There are few differences between the both including the
addition of the Deposit ticket ID and the Payment Method fields.

Now enter the deposit Ticket ID field. The Deposit ticket ID
field is used to combine receipts for the fast account reconciliation with bank
statements
Then we select the customer or vendor ID from the drop down
list.
We have the option of entering a receipt from a customer or
a vendor. If the customer has no outstanding balances then the system shows
Apply to revenue. By double clicking on any unpaid invoice the transaction
details can be seen.

·
Enter a reference number which is used to
identify the receipt. So we have to enter a reference number.
·
After it enter the date of the receipt. Write
that date on which we received the check, not that date which is mentioned don
the check.
·
Select a payment method that is cash, check, charge
and so on .select the check from the payment Method drop down list Customer
Defaults dialog box.
·
In the cash account list, verify the bank account
into which we are depositing the receipt.
·
Place a check mark in the pay column beside each
invoice being paid by this receipt.
=================
=================


